Here in this category we present the information and method of performing many common tasks in MS Word 2003 and 2007. These are the skills expected in any candidate of Data Entry Supervisor or Computer Operator exam.
- Choosing Suitable Paper Size for Your Document
- Setting Margins to Print on Both Sides of Paper
- Set Up A Book with 8 Sheets per Booklet
- Set Up Even Page Header And Footer Different Than on Odd Pages for A Document with Cover Page
- Create Both Portrait And Landscape Pages on Same Document
- Add line numbers in document
- Insert Header and Footer in MS Word Document
- Create Columns on A Part of Document Only
- Create Parallel Columns in Document
Choosing Suitable Paper Size for Your Document
First thing I set up before I start creating any new document is choosing the suitable paper size. You must set the size of paper on which you will print it when the document is ready.
People often complain that MS Word did not print the page as expected. It is more common when you make a document to print two pages on one sheet of paper. You’ll notice the flaw when you fold it for booklet. The white space (margin) on the edge for all pages had to be same but is not the case while printing. This problem is often caused because you did not set paper size correctly – The paper set in MS Word is Letter (by default) and the paper you feed in printer is A4.
Different type of documents require different sized paper such as general letters, reports are printed on letter size paper or A4 size paper whereas Envelops, Address labels etc. require a different sized paper.
How to set paper size of your document?
The default page setup in Microsoft Word is based on letter-sized paper. For most of the documents it is fine. But, you may want to print on legal- or even tabloid-sized paper. Or, you could want to specify a custom paper size. No problem! Changing the document paper size in Word 2007 is painless.
Using Word 2007 or Word 2010
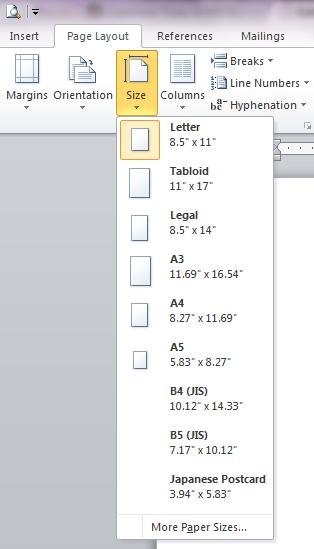
Paper Size Menu in Page Layout Tab
Setting up paper size on Word 2007 or Word 2010 is very easy. All you need to do is Click on Page Layout tab on ribbon then click the Size button in Page Setup group. Then from the resulting list choose the required paper size. If you need to specify a size that is not available in list, you can click on More Paper Sizes.. to open Page Setup dialog box where you can type width and height of the paper you require.
Alternately, you can click on Page Setup dialog launcher to open Page Setup Dialog box.
Similarly, double clicking 0n the margin area of ruler also opens Page Setup Dialog box.
Using Word 2003
In MS Word 2003 the only way to set paper size is through Page Setup dialog box. You can open Page Setup dialog box by following the menu sequence File >> Page Setup. Similarly there are other methods to open Page Setup dialog box.
Now, in Page Setup dialog box, click on Paper tab. Choose the required paper size from the pre-set list or type the width and height values in spinner boxes.
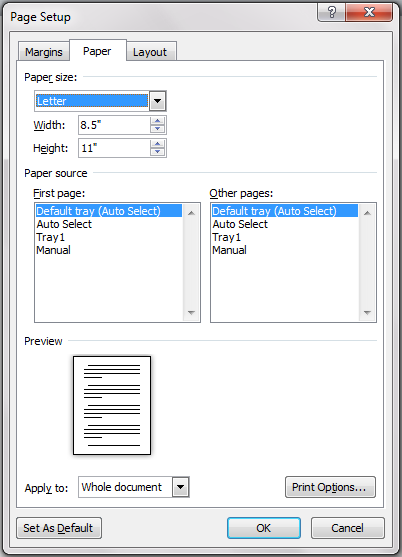
Paper Tab in Page Setup Dialog Box
Setting Margins to Print on Both Sides of Paper
Margins are the amount of white space that appears at the top, bottom, left, and right edges of your document. Sufficient margin on every side of paper makes comfortable reading and better presentation of content.
Though margins are defined as white space around the page, header and footers are placed in top and bottom margin respectively. It is only the header and footer that appear on margin, otherwise everything else (including footnote and endnote) are placed within the text area.
Setting up margin for your document is fairly easy and obvious. Please see the page on Page Setup Dialog Box to discover more about it. In this post, I’ll be talking about setting up margins so that it fits best when you print on both sides of paper.
Set Margins to Print on Both Sides of Paper
The normal margin settings will work fine if the required left and right margins are equal. You can set same value for the Left and Right spinner box in Margins tab of Page Setup dialog box.
The problem rises when the left margin and right margin are of different size or if you need to bind the pages after printing. If you are planning to print on both sides of paper, the normal margin settings won’t work. This is because the left margin of Page 1 (odd pages) should be equal with the right margin of page 2 (even pages) and the right margin of page 1 should be equal with the left margin of page 2. Thus instead of Top, Bottom, Left and Right margin settings, you require Top, Bottom, Inside and Outside margin sets.
To set Inside and Outside Margins:
- Open Page Setup dialog box. If you don’t know how please see How to Open Page Setup Dialog Box
- Margins tab is at the front by default. If not, click on Margins tab.
- Open Multiple Pages drop down list and choose Mirror Margins. Notice how Left and Right margin spinners changes to Inside and Outside.
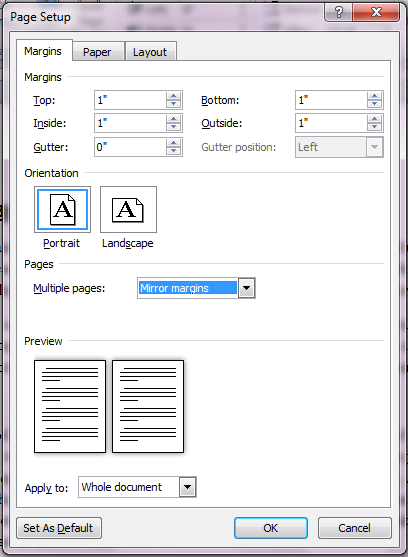
Mirror Margins in Page Setup Dialog Box
- Enter values of Inside margin and Outside margin.
- You can specify Gutter margin if you have not included binding space in Inside margin. Gutter position depends on the page orientation and thus is disabled.
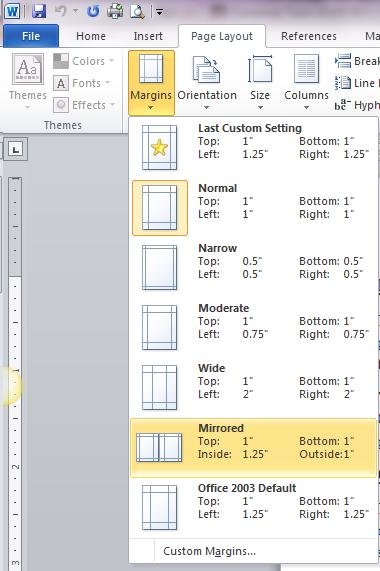
Mirrored Margin Setting on Page Layout Ribbon
For MS Word 2010 users, there is a pre-set mirror margin setting available if you need 1″ top and bottom margins and 1.25″ & 1″ inside and outside margins. Simply navigate to the Page Layout tab on the ribbon and click the Margins button on Page Setup group. It will produce a list of pre-set margin settings. Choose Mirrored.
Set Up A Book with 8 Sheets per Booklet
Binding a thick book with single folding is troublesome. You might have noticed the edge of book on right is sloppy rather than straight cut. It requires smaller sheets for inner page and gradually larger for the outer pages, which is not possible. The solution to this problem is to print the thick book into multiple smaller booklets. This will make binding easier and the right edge is perfect.
MS Word has feature to print thick book into multiple booklets and you can decide how many sheets you want to allow in one booklet. The good thing is that you don’t need to worry about page numbering, Word is smart enough to do the task for you.
To set up a book with 8 sheets per booklet:
- Open Page Setup dialog box. There are a couple of other methods to open Page Setup dialog box other than simply following the menu sequence.
- Go to Margins Tab
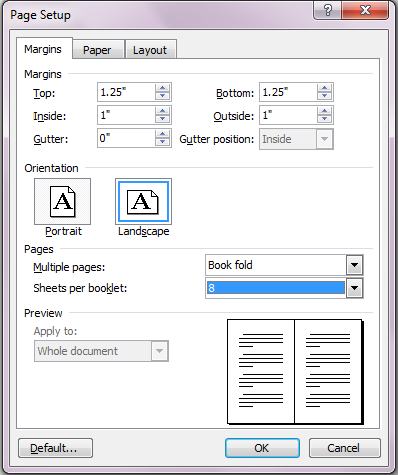
Book fold on Page Setup Dialog Box
- Choose Book fold on Multiple Pages drop down list
- Open Sheets per booklet list and choose 8
Set Up Even Page Header And Footer Different Than on Odd Pages for A Document with Cover Page
The text that appears on top of every page is a header and on bottom is footer. You can learn how to insert header and footer in its respective page but here I’d like to draw your attention towards setting up header/footer for even pages different than odd pages for a document which contains cover in its first page.
It is obvious that the header/footer for cover page of a document can never be same as that of inner pages. Moreover, you may need to display headers/footers on even pages different than on odd pages.
The options to set different header/footer setting for first page as well as even and odd pages are available in Page Setup dialog box.
Create Both Portrait And Landscape Pages on Same Document
Would you ever need to have mixed orientation on same document?
There are times when you need to use tables, pictures, charts or graphs in a Microsoft Word document. These elements may have been created within Word, or imported by copy/paste, or inserted as a file from a different source, such as Excel. These pages may need to use the Landscape page orientation for the best display of their information. Good thing is that, Microsoft Word allows for this type of mixed page orientation within a document.
You can set the page orientation when you are creating document or later on even after the pages are created. Use Page Setup dialog box when you are creating document. You can use Section Breaks to change the page orientation if you’ve already created pages.

Create Portrait and Landscape pages using Page Setup
If you are rotating pages when creating document, you can use Page Setup dialog box alone. To do this:
- When working with portrait pages place the insertion point at the end from where you need the next page as landscape
- Open Page Setup dialog box
- Click on Landscape orientation
- Open ‘Apply to‘ drop down list and choose ‘This point forward‘
- Click OK to close Page Setup dialog box.
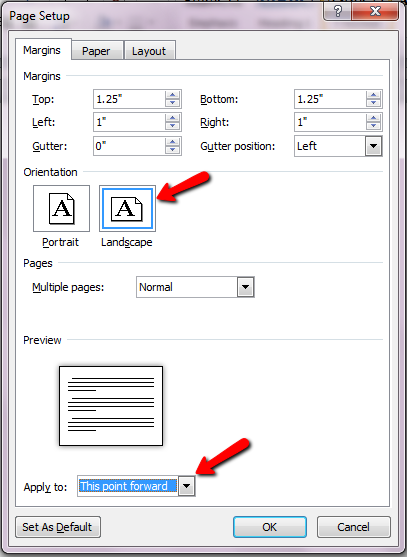
- Now, you’ll return to the document. Notice the new page is in Landscape orientation when all the previous page are still Portrait.
- After you create all the pages required in landscape orientation, you can create next page in portrait orientation. Repeat the process to create portrait. DON’T FORGET TO CHANGE Apply to DROP DOWN LIST TO This Point Forward.
Section breaks
Section breaks are the marks that separate different sections of a document. Section breaks hold all the section formatting such as column layout, margins, page orientation, paper size, header/footer etc.
So, if you need different document level format than you are currently working with, you need to change section break. Please see the page about Section Breaks for more information.
To insert section break in Word 2003, follow the menu sequence Insert >> Break, then choose any one of the required section break.
To insert section break in Word 2007 or Word 2010 go to Page Layout tab on ribbon and click on Break button on Page Setup group.
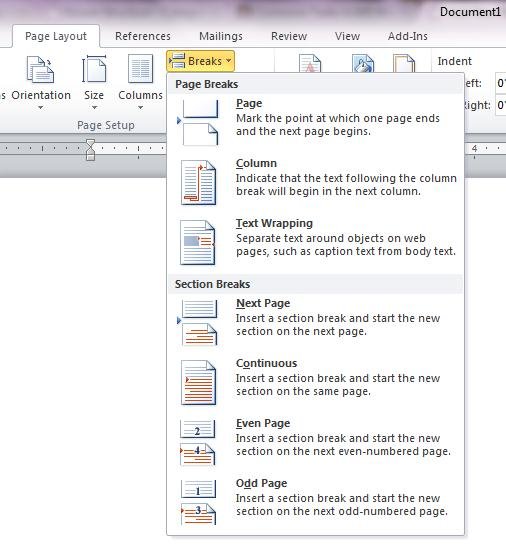
Page Breaks and Section Breaks in Word 2010
Create Portrait and Landscape pages using Section Breaks
If you already have pages and you need to modify some pages into landscape orientation, you can use section breaks.
- Insert a section break from where you need different page orientation.
- Similarly insert another section break up to which point you need that orientation.
- Now place insertion break inside the section whose pages you need to change into Landscape
- In Word 2003, open Page Setup dialog box, go to Margins tab and click on Landscape orientation. Notice that the Apply to combo box contains ‘This section’. Click OK to close dialog box.
- In Word 2007 or 2010, open orientation list on Page Layout ribbon. Choose Landscape.
- Great! the pages within the section are converted into Landscape orientation
Add line numbers in document
Though you rarely need to print line numbers in general documents, but sometimes, it can be greatly handy if you know how to add line numbers in document. Some obvious uses might be when you are creating technical documents with program codes, poetry, scripts or legal contract etc.
Microsoft Word can automatically count the lines in a document and display the appropriate number beside each line of text. While counting MS Word follows:
- A table is counted as one line.
- A figure is counted as one line.
- A text box is counted as one line if it is positioned inline with the text on the page. If text on the page wraps around the text box, the lines of text on the page are counted. Lines of text inside a text box are not counted.
You can display line numbers in all or part of the document. Or you can display line numbers at intervals, such as every tenth line (10, 20, 30, and so on).
To Insert Line Numbers in Word 2003
- Place the insertion point inside the required section that you want to apply line numbers.
- Open Page Setup dialog box. (File >> Page Setup)
- Go to Layout tab and click on Line Numbers button
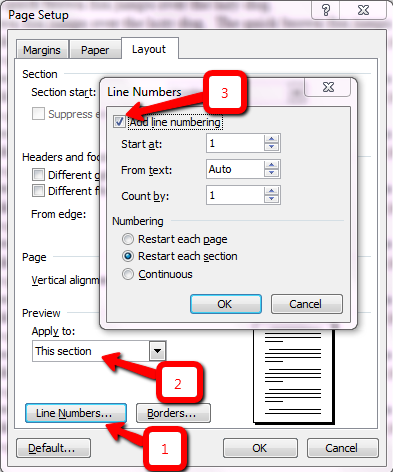
Add Line Numbers Dialog Box
[1] Opens Line Numbers dialog box
[2] Notice on what the numbering will be applied
[3] Enable or disable line numbering in your document
- In Line Numbers dialog box mark the Add line numbering check box to enable line numbering. Turning it off will remove numbering from your document.
- You can change Start at box if you don’t wish to start counting from 1.
- Specify the distance of numbers from text on From text box.
- Specify the interval of numbering in Count by box. If you enter 10 here, the lines will be numbered as 10, 20, 30 and so on.
- Decide whether you want to restart numbering for each page, section or go on counting continuously.
- Click OK to close dialog boxes. You’ll see numbers displayed on the document.
Insert Line Numbers in Word 2007 or 2010
MS Word 2007 and 2010 offers even more ease in numbering lines in document. You can find the commands for line numbering in Line Numbers tool in Page Setup group of Page Layout tab on ribbon.
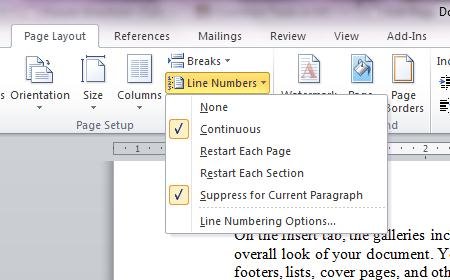
Line Numbers in Word 2010
- None: Removes line numbers if it already exists.
- Continuous: Add line number continuously on document
- Restart Each Page: Add line numbers in document and restart numbers on each page
- Restart Each section: Add line numbers in document and restart numbers on each section
- Suppress for Current Paragraph: Don’t apply line numbering for current paragraph. Skips current paragraph.
- Line Numbering Options…: Opens Page Setup dialog box with Layout tab fronted. Click Line Numbers… button there to open Line Numbers dialog box.
Line Numbers dialog box for Word 2003 and 2007/2010 are same.
Insert Header and Footer in MS Word Document
Header and Footer
Vital information about your document such as document title, page numbers, creation date, author, etc. placed at the top of the page is known as Header and at the bottom of the page is known as Footer. Documents may contains either headers or footers or a combination of both.
You can type these information at the top or bottom of body text but if you place them in a header or footer outside of the document body, you can rest assured that this information will always retain the correct placement, no matter how much you edit the content of your document.
Microsoft Word includes a considerable amount of advanced options for working with headers and footers; you can insert AutoText entries such as filename and path, dates, and page numbers that will automatically update as your document changes. Additionally, you can specify that the first page and/or odd pages have different headers and/or footers; once you understand how they work and how to manipulate the options by taking advantage of section breaks, you can even give every single page a different header and footer! [Source: about.com]
Insert Header/Footer in Word 2003
It is fairly easy to insert headers and/or footers in Word 2003 document. To insert header and footer:
- From View menu choose Header and Footer
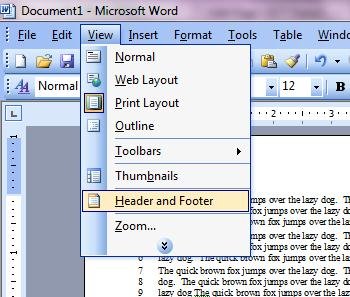
Header and Footer Menu in Word 2003
- Header and Footer area will be marked with dashed border and a Header and Footer toolbar will be visible
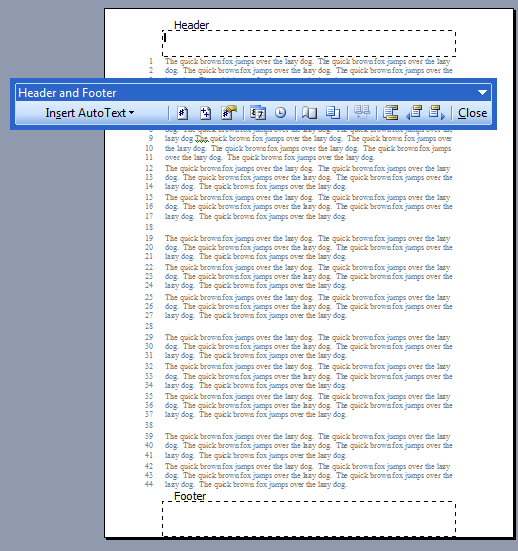
- Enter the required content for header and footer and click on Close button on Header and Footer toolbar. The header or footer is inserted on every page of the document.
- If necessary, you can format the text in the header or footer by selecting the text and using the formatting options on the toolbar.
- The text or graphic you enter in a header or footer is automatically left aligned. You may want to center the item instead or include multiple items (for example, a left-aligned date and a right-aligned page number). To center an item, press TAB; to right align an item, press TAB twice.
- You can also use buttons on the Header and Footer toolbar to enter text into the header and footer area.
Header and Footer Toolbar
The Header and Footer toolbar in Word 2003 contains 13 buttons. The description of each button is given below (numbering from left to right):
- Insert Auto Text: Inserts AutoText, a time-saving entry composed of an abbreviation and an associated phrase.
- Insert Page Number: Inserts current page number for every page in document
- Insert Number of Pages: Inserts the total number of pages of document
- Format Page Number: Opens Page Number Formats dialog box
- Insert Date: Inserts system date in cursor position
- Insert Time: Inserts system time in cursor position
- Page Setup: Opens the Page Setup dialog box
- Show/Hide Document Text: Toggles the display or hides document text
- Link to Previous: Makes the header or footer same as in previous section. Turn it off if you need different header/footer for current section.
- Switch between Header and Footer: Jumps the cursor between header and footer
- Show Previous: Shows header or footer in previous section
- Show Next: Shows header footer in next section
NOTE: The previous and next options are relevant when your document is divided into sections. - Close: Closes Header and Footer view
You can work with headers and footers much the same way you work with text in the body of your document: Toolbar buttons are still available for use, so you can change the font, add different formats to it, and specify paragraph options. You can also copy information from the body of your document and paste it into the headers and footers or vice versa.
While they will appear on the page in Print Layout view, you will not be able to edit your headers or footers as you would the rest of your document. You must first open them for editing from the View menu; double clicking on the text within the header/footer will also open them for editing. You can return to the body of your document either by selecting Close from the toolbar or by clicking within the body of the document.
Insert Header / Footer in Word 2007 or Word 2010
Header and Footer commands are place on Insert tab in Word 2007 and 2010 (contrast in 2003 it was available in View menu). It is much quicker to insert header or footer in 2007 or 2010 if you require is generic type of content for header/footer. MS Word offers some pre-built header setting and footer setting which matches greatly for common requirement.
You can access header or footer options by:
- Click on Page Layout tab on ribbon.
- Click the Header button on Header & Footer group to open options for header. Similarly, next is the footer button if you intend to insert footer.
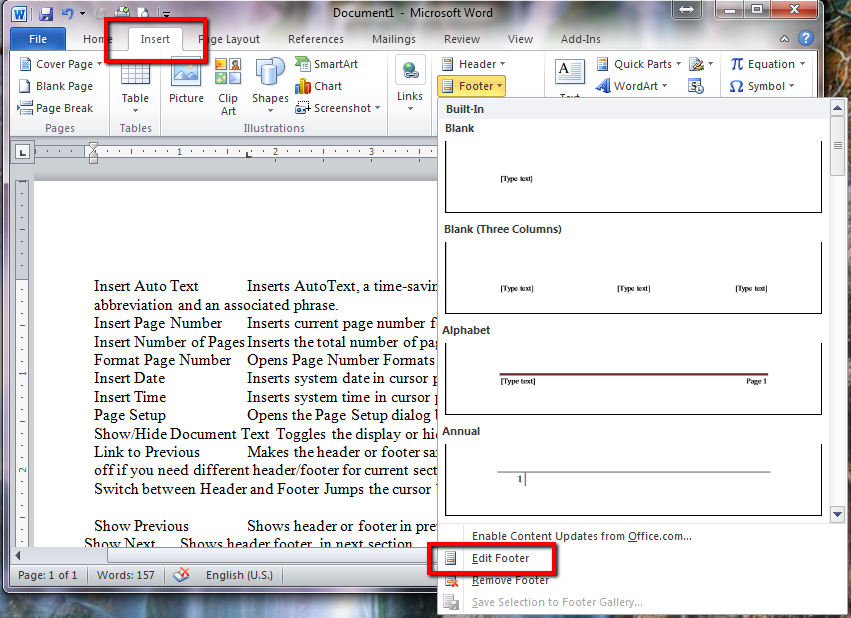
Footer Options in Word 2010
- The list extends which contains some header or footer designs. You can click on any of them to apply on your document. The selected header or footer is applied for your document.
- Should you feel that the pre-built header or footer setting does not suit for you, you can click on Edit Header menu in that list to access full set of commands to craft your heading or footer content.
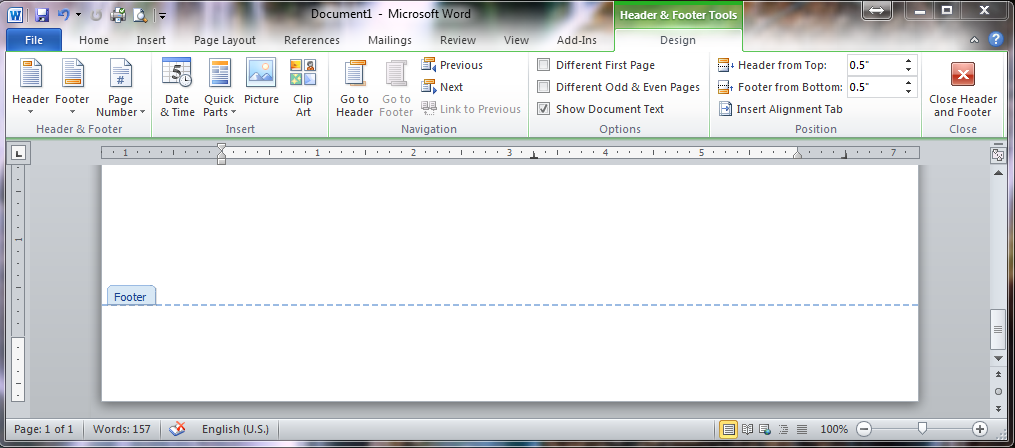
Footer Editing Screen in Word 2010
- Enter your header and/or footer text. After you finish, click on Close Header and Footer button on the ribbon.
Design Tab for Header Footer Tools

Header : Opens built-in header list
Footer: Opens built-in footer list
Page Number: Contains options to insert and format page numbers
Date & Time: Opens Date and Time dialog box to insert current system date in header or footer. (Mark update automatically check box if you wish to change to the current date and time when document opens.
Quick Parts: Opens Quick Parts list. Use this list to insert Auto Text, Document Property and different required Fields.
Picture: Allows you to insert pictures on header or footer
Clip Art: Insert clip art pictures in header or footer
Go to Header: Jumps to header editing area
Go to Footer: Jumps to footer editing area
Previous: Jumps to previous section header or footer
Next: Jumps to next section header or footer
Link to previous: When turned on creates same header and footer for this section as of previous section. Turn it off if you want different header or footer for current section.
Different First Page: If enabled, it lets you set different header/footer for first page of each section
Different Odd & Even Pages: If enabled, it lets you set different header/footer for odd pages and even pages
Show Document Text: Show or hide text on document. Turn it off if document text is distracting you designing header or footer.
Header from Top: Distance of header content from top edge of page
Footer from Bottom: Distance of footer from bottom edge of page
Insert Alignment Tab: Lets you insert tab stop mark with alignment and leader
Close Header and Footer: Returns to the document editing screen from Header/Footer editing screen.
Create a Document with Header and Footer from Second Page Only
Most of the documents whether books or reports contain the cover page on first page. And on cover page, it does not suite the headers and footers. Thus you need to start displaying headers and footers from second page only.
- To set header and footer from second page only, you should enable ‘Different First Page’ check box in Layout tab of Page Setup dialog box. If you are working in Word 2007 or 2003, you can mark this check box on Design Tab when working in Header or Footer editing screen.
- Go to the second page header or footer by clicking on Show Next button on Header & Footer toolbar (Word 2003) or Next button on Design tab (word 2007 or 2010). Don’t forget to disable ‘Link to previous’ check box on Header and Footer toolbar (Word 2003), on Navigation group on Design tab (Word 2007 or 2010)
- Now, Enter the required header or footer on second page.
Display Header and Footer from 10th Page Only
If the document contains a number of pages not suitable to display header and footer, you may need to start displaying header and footer after several pages. The pages such as inner cover page, acknowledgement page, author’s words page, distinguished wishes pages, table of content pages etc. should not have header and footer text on them. The header and footer will appear only form the page where regular content begins.
You can achieve this by using sections in document. Start a new section from where regular content begins (Page 10 for this example). Don’t enter anything on header and footer for all the sections before this section. When you reach the 10th section, remember to disable ‘Link to previous’ check box. Enter your header and footer. This way you can skip a number of sections from displaying header or footer in them.
Disable Header and Footer for some pages in the middle of document
Some pages such as charts, images, tables that are displayed as separate page should not display header or footer in them (except page numbers in some cases). You can remove header and footer for those pages by creating sections for those pages and removing header and footer content after disabling ‘Link to previous’ button.
Edit or Remove Existing Header or Footer in Document
If you document already has header and footer but you need to modify something in it or remove it completely, how will you do it?
Yes, you can go to the header or footer editing screen and then edit or remove the header or footer. Remember, you can double click on the header or footer to go to header or footer quickly.
Create Columns on A Part of Document Only
Here, we are talking about creating columns on a part of document, not the whole document. If it were to create column in whole document, you could just open Columns dialog box, then select the number of columns and OK. However, if your document requires you to create two columns somewhere and one column on somewhere else, you need to have a bit more information.
Columns are section formatting or document level formatting. One section can contain only one type of column layout. So, if you are typing in one column layout and now you need three columns from that point forward, you should break the section right at that point and start a new section. (see Section Break)
MS Word can automatically insert section break when you change column layout after selecting some text. It will also insert section break automatically when you choose ‘This Point Forward’ in Columns dialog box.
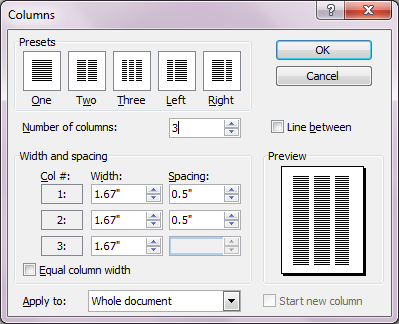
Columns Dialog Box
Creating columns by selecting text
- Select required text that needs to be converted into different column layout.
- Click on columns button on Standard Toolbar.
- On the produced list, click and drag to specify number of columns
- Your selected text is converted into a number of columns you’d specified.
Note: Switch to Normal View (View >> Normal) to see the section breaks MS Word inserted automatically. Alternately, you can click on Show/Hide button on Standard Toolbar to display non printing characters in Print Layout View as well.
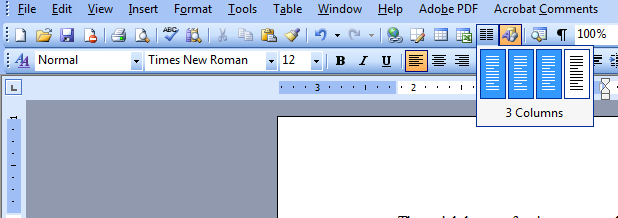
Columns Tool on Standard Toolbar
Creating columns for a section in document
If your document is already divided into different sections, you can apply column layout to a particular section only. To do that:
- Place the insertion point inside the section which you want to change into columns
- Click on Columns button on Standard toolbar and choose number of columns
The current section will be converted into specified number of column layout.
Create Heading in one column and body text in three column
- Type heading normally
- Place the insertion line just below the heading
- From Format menu choose Columns. Columns dialog box will open.
- Choose number of columns in dialog box (3 in this example)
- Choose ‘This point forward’ in Apply to drop down list
- Click OK to close the dialog box
- Now, start typing the text for columns.
Heading is on single column layout and the body text in 3 columns.
Create a single column below the three column layout
If you are typing in three column layout, you can start one column below it in two ways:
1) Insert section break and create single column for new section
2) Open Columns dialog box and choose 1 column and ‘This point forward’ in apply to box in Columns dialog box.
Note: You can’t create multiple columns inside text boxes
Creating Columns in Word 2007 or 2010
You can find options for working with Columns in Word 2007 or Word 2010 under Page Layout tab in ribbon. In Page Setup group there is a Columns button.
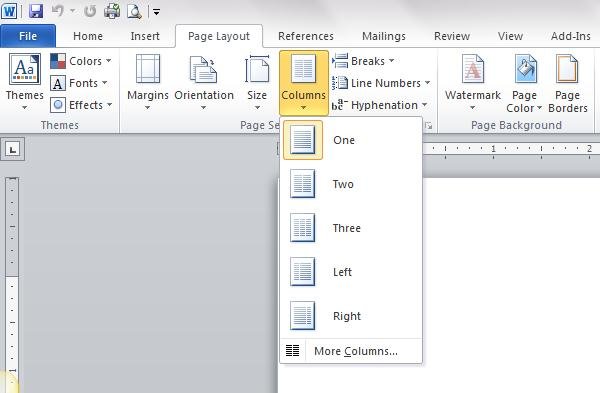
Columns Options in Word 2010
Click on any of the required presets from the list. If you need to open Columns dialog box, click on More columns menu at the end.
Create Parallel Columns in Document
Parallel columns runs through the pages independently with one another and thus they are known as parallel columns. Parallel Columns are nothing more than a way to present side-by-side (parallel) text. When the bottom of the first column is reached on the first page, the text continues at the top of the first column on the second page.
In WordPerfect there are two types of columns you can create: newspaper columns and parallel columns. The phrase ‘parallel columns‘ must be the continuity of WordPerfect legacy.
In fact in MS Word there is nothing like parallel column, though, you can follow some workaround to achieve similar effect. Common workaround would be:
- Using Columns
- Using Text Boxes
- Using Tables
Using Columns
Microsoft designed its Columns as a command to create newspaper style column, so it is not of much use for parallel column. However, if your text fits within one page or does not need to extend into following pages, you can use Columns to create parallel column.
To create parallel columns using Columns command, press Ctrl+Shift+Enter or Insert >> Break >> Column Break to end one column and start the next column.
Creating parallel columns using Column command in MS Word is completely useless if your text runs into multiple pages.
Using Text Boxes
Another way to create parallel column in MS Word is to use text boxes. Draw text boxes on the page as you need the columns. Remove fill color and line color if needed.
If your content runs multiple pages, you can also use linked text boxes to flow the text properly from one page to another.
Using Tables
Tables are better tools, as I like them, to create parallel columns. Insert table with one row and required number of columns. You can insert one blank column in between to better handle the space between columns.
Table approach for parallel column appears to be perfect. It behaves similar to that of WordPerfect parallel columns command. However, there are some drawbacks of this approach.
1) MS Word assumes that you want a border around the table. You need to remove borders manually. You may also need to play with table layout and properties.
2) If your single row table runs for multiple pages (a larger number of pages), the document become unstable. To solve this you should split the table into number of tables depending on your content.
Leave a Reply